Create your own visited states map or check out the JavaScript Charts.

Handmade Children's Collection. I love sewing. Sharing my projects and sewing tidbits.
Tuesday, March 15, 2016
The states I have made sales in
So of course I have seen this on Instagram. I saw a shop I follow had a map of the U.S. and the states she has had sales in. I found this super interesting. So I decided to take a few minutes(which turned into more than a few. but whatever.) and see which states LITTLE LAPSI has shipped to. I thought that it was awesome to find that there were only THREE states that someone hadn't ordered their own LITTLE LAPSI wear. So, I have decided to make a discount for those states to try and finish off this map! Those states are Wyoming, Nebraska and Vermont. So, if you know anyone in those three states, let them know. Or if you are in that state, take a look through my shop: www.littlelapsi.com or instagram: @littlelapsi. If you see something you like, send me an email and I will get the discount code to you!
Have a good day!
-Brianna
Friday, October 31, 2014
How to shirr on a Babylock Melody sewing machine
Shirring on my Babylock Melody sewing machine.
I recently tested a great pattern that I will share when I get permission.
I said I would do the testing not knowing that there was any shirring involved.
(This post is much more delayed than I ever thought possible, and the shirring project I learned this all on is posted here: whoops!)
During my research on how I was to shirr and whatnot, I came across many posts that said
it is just not possible on Babylocks (as well as Brother) machines. ACK. I thought I was done then!
But I wasn't. I kept looking and I posted on a Facebook Forum my question.
If anyone in the group has a Babylock and asked if they are able to shirr.
A few people replied and that was my first step to realizing I could do it!
A few people said to go get an extra bobbin for shirring, but I decided I will try mine first before I purchase another bobbin. I didn't adjust ANYTHING on my existing bobbin
What you need:
*elastic thread( I read the Dritz brand isn't a favorite)
*regular thread(matching your fabric)
*sewing machine
*empty bobbin (or 2 or 3, depending on your project)
*fabric(in this case cotton)
*washi tape(optional)
To start, you can either hand wind your bobbin with the elastic thread pulling a little taught.
Just not too tight or too loose. (This is where I couldn't seem to get it right)
OR, You let your machine wind the bobbin (hallelujah!!!)
I found it to be the best if I put the elastic thread on the thread holder and let the thread roll over my fingers. You follow the numbers as you would thread a normal bobbin. I just didn't put it into the tension gauge. (you want to make sure you don't let the elastic go underneath the bobbin(could potentially cause a problem or two).
Then, you take your wound bobbin and I found it easiest to take off the coverplate of the bobbin area to MAKE SURE YOU GET THE ELASTIC INTO THE TENSION AREA!!!!(I only bold this because this is where I spent A LONG time trying to figure out how to get it to work on my machine!)


Don't Do the following picture!! (auto cut)

Then you can put the cover back on and thread like normal.
I didn't have a need to change my auto- settings (babylock melody)

Get your fabric (that has the line you will follow marked) , and place it right side up.
 The elastic should slightly gather and be straight on the backside. If it is at all wavy, loose it won't work. If it looks loose, check to see that the elastic thread is tight in the bobbin. Don't auto cut. Always pull the threads out and snip when not taught, as you don't want the elastic to get lost in the bobbin area. Pull the threads out and start over.


To start, I went 2-3 stitches and then reversed 2-3 stitches and kept going...at the end of the row, backstitch again a few and go forward. You will want to pull out the fabric and trim the threads. Don't use the Auto-cut option if you have it!! Time to begin on the next row. The thing to note here is that you will want to make sure you have enough elastic to finish an entire row! (ripping this out is a pain, ask me how I know :/ )
Keep going for as many rows as you need. It definitely bunches up with 3+ rows! For the dress I was working on here, I only needed 2 rows on this sleeve. Use your foot as a guide to keep the rows even.
Before ironing:

 (Sorry for the bad lighting!)
Keep going for as many rows as you need. It definitely bunches up with 3+ rows! For the dress I was working on here, I only needed 2 rows on this sleeve.
When you are finished, take an iron and PRESS (do not move across) your newly shirred fabric. You may add steam to get it to bunch more if you need. I have included a before and after picture to show HOW MUCH IRONING YOUR SHIRRED FABRIC WILL HELP!! It makes a HUGE HUGE difference!
After Ironing:

 If you have questions, email me or post in the comments and I will try to reply ASAP.
Thank you for looking, and I hope I was able to help someone!
Have a good day!
Brianna
If anyone in the group has a Babylock and asked if they are able to shirr.
A few people replied and that was my first step to realizing I could do it!
A few people said to go get an extra bobbin for shirring, but I decided I will try mine first before I purchase another bobbin. I didn't adjust ANYTHING on my existing bobbin
What you need:
*elastic thread( I read the Dritz brand isn't a favorite)
*regular thread(matching your fabric)
*sewing machine
*empty bobbin (or 2 or 3, depending on your project)
*fabric(in this case cotton)
*washi tape(optional)
To start, you can either hand wind your bobbin with the elastic thread pulling a little taught.
Just not too tight or too loose. (This is where I couldn't seem to get it right)
OR, You let your machine wind the bobbin (hallelujah!!!)
I found it to be the best if I put the elastic thread on the thread holder and let the thread roll over my fingers. You follow the numbers as you would thread a normal bobbin. I just didn't put it into the tension gauge. (you want to make sure you don't let the elastic go underneath the bobbin(could potentially cause a problem or two).
Then, you take your wound bobbin and I found it easiest to take off the coverplate of the bobbin area to MAKE SURE YOU GET THE ELASTIC INTO THE TENSION AREA!!!!(I only bold this because this is where I spent A LONG time trying to figure out how to get it to work on my machine!)
^^^Make sure you pull the thread thru the slit along the bobbin and out a few inches.
Turn the knob towards you while holding the top thread tight. The elastic should come up as you turn the wheel towards you. Once you see the elastic come up, get tweezers or thread cutter and then catch
the elastic thread. This may take a few tries and patience. You may have
to help it unwind a little off the bobbin to get it going. Then just
pull 3-4 inches out behind.
Don't Do the following picture!! (auto cut)
Then you can put the cover back on and thread like normal.
I didn't have a need to change my auto- settings (babylock melody)
Get your fabric (that has the line you will follow marked) , and place it right side up.
To start, I went 2-3 stitches and then reversed 2-3 stitches and kept going...at the end of the row, backstitch again a few and go forward. You will want to pull out the fabric and trim the threads. Don't use the Auto-cut option if you have it!! Time to begin on the next row. The thing to note here is that you will want to make sure you have enough elastic to finish an entire row! (ripping this out is a pain, ask me how I know :/ )
Keep going for as many rows as you need. It definitely bunches up with 3+ rows! For the dress I was working on here, I only needed 2 rows on this sleeve. Use your foot as a guide to keep the rows even.
Before ironing:
Keep going for as many rows as you need. It definitely bunches up with 3+ rows! For the dress I was working on here, I only needed 2 rows on this sleeve.
When you are finished, take an iron and PRESS (do not move across) your newly shirred fabric. You may add steam to get it to bunch more if you need. I have included a before and after picture to show HOW MUCH IRONING YOUR SHIRRED FABRIC WILL HELP!! It makes a HUGE HUGE difference!
After Ironing:
Thank you for looking, and I hope I was able to help someone!
Have a good day!
Brianna
Friday, October 24, 2014
Little Harem shorts
Here is a pair of shorts I made this summer for my 2 little boys. My baby wears his all the time, and my 2 (now 3) year old prefers his "sports" outfits like his two older brothers. Give them tennis shows, and you know what they are wearing nearly every day :)


I love this fit on a little baby! Can be boy or girl in my opinion. Just use the fabric you like.

This next outfit is an outfit I made for my sisters new baby boy.
(I doubled it up and also made it for a friends new baby, as they were born close together)

I love the look of the finished results of these sweatpants, although a bit time consuming, But for a gift, all I have is time :)
Have a good day!
Wednesday, October 22, 2014
It's been a WHILE!
Wow. I forgot I had a blog.
Hence the reason that I haven't posted in over a year!
But I am now going to try and post more often.
(Well, that won't be hard- 2x a year! haha)
Anyways, I will start off by posting a link to my shop
on Etsy, where you can find a few handmade clothing items for the little babes!
This baby gown is currently unavailable as I am waiting for the rest of my fabric to arrive in the mail, patiently right? To join the vintage motorcycle lineup, there will be bibs, and a few clothes items. Swaddles and hats will be available as well, but yah. Still waiting on the UPS guy. Stalking? no...

These UNISEX shorts are soo comfy! My little boy has been wearing his for months. And here in Phoenix--yah--still shorts weather!! They wash really well! (But with all my clothes, I recommend to wash inside out and hang dry as they do look nicer A LOT longer!)

These leggings are so soft! The ones I make now are just a tad adjusted, as I don't do the waist to have the tie anymore. So, I should take a new photo I guess.

It's always funny to me how sometimes the same thing sells within a few days of eachother! I sold one of these outfits locally last week and then this weekend, a lovely lady purchased through Etsy, and so that makes this outfit SOLD OUT! I love this fabric. It is soo comfy! I do have other colorways in the material to make this, if someone be interested.

Since I will save a few things for another post, I will sign off now.
Have a good day!
-Brianna
Thursday, August 22, 2013
Carseat canopy for Baby K
So this is Thursday.
The week has flown by! (So today needs to be as productive as they come.)
I have had some nieces born this past July. Two. And they are precious as they come.
I am showing the CARSEAT CANOPY/strap covers I made as a gift for Baby K.
It started out because I want to hand make the gifts for the babies born this year.
(as long as I have time, energy etc)
Also, the fact that it gives me an excuse to buy new fabric (ha)
and make a project that I have been wanting to try but needing an occasion.
(Also known as a deadline. You know those people who work best under pressure?? My name is RIGHT there)
Without further nonsense, here are the photos I took before giving it to Baby K.

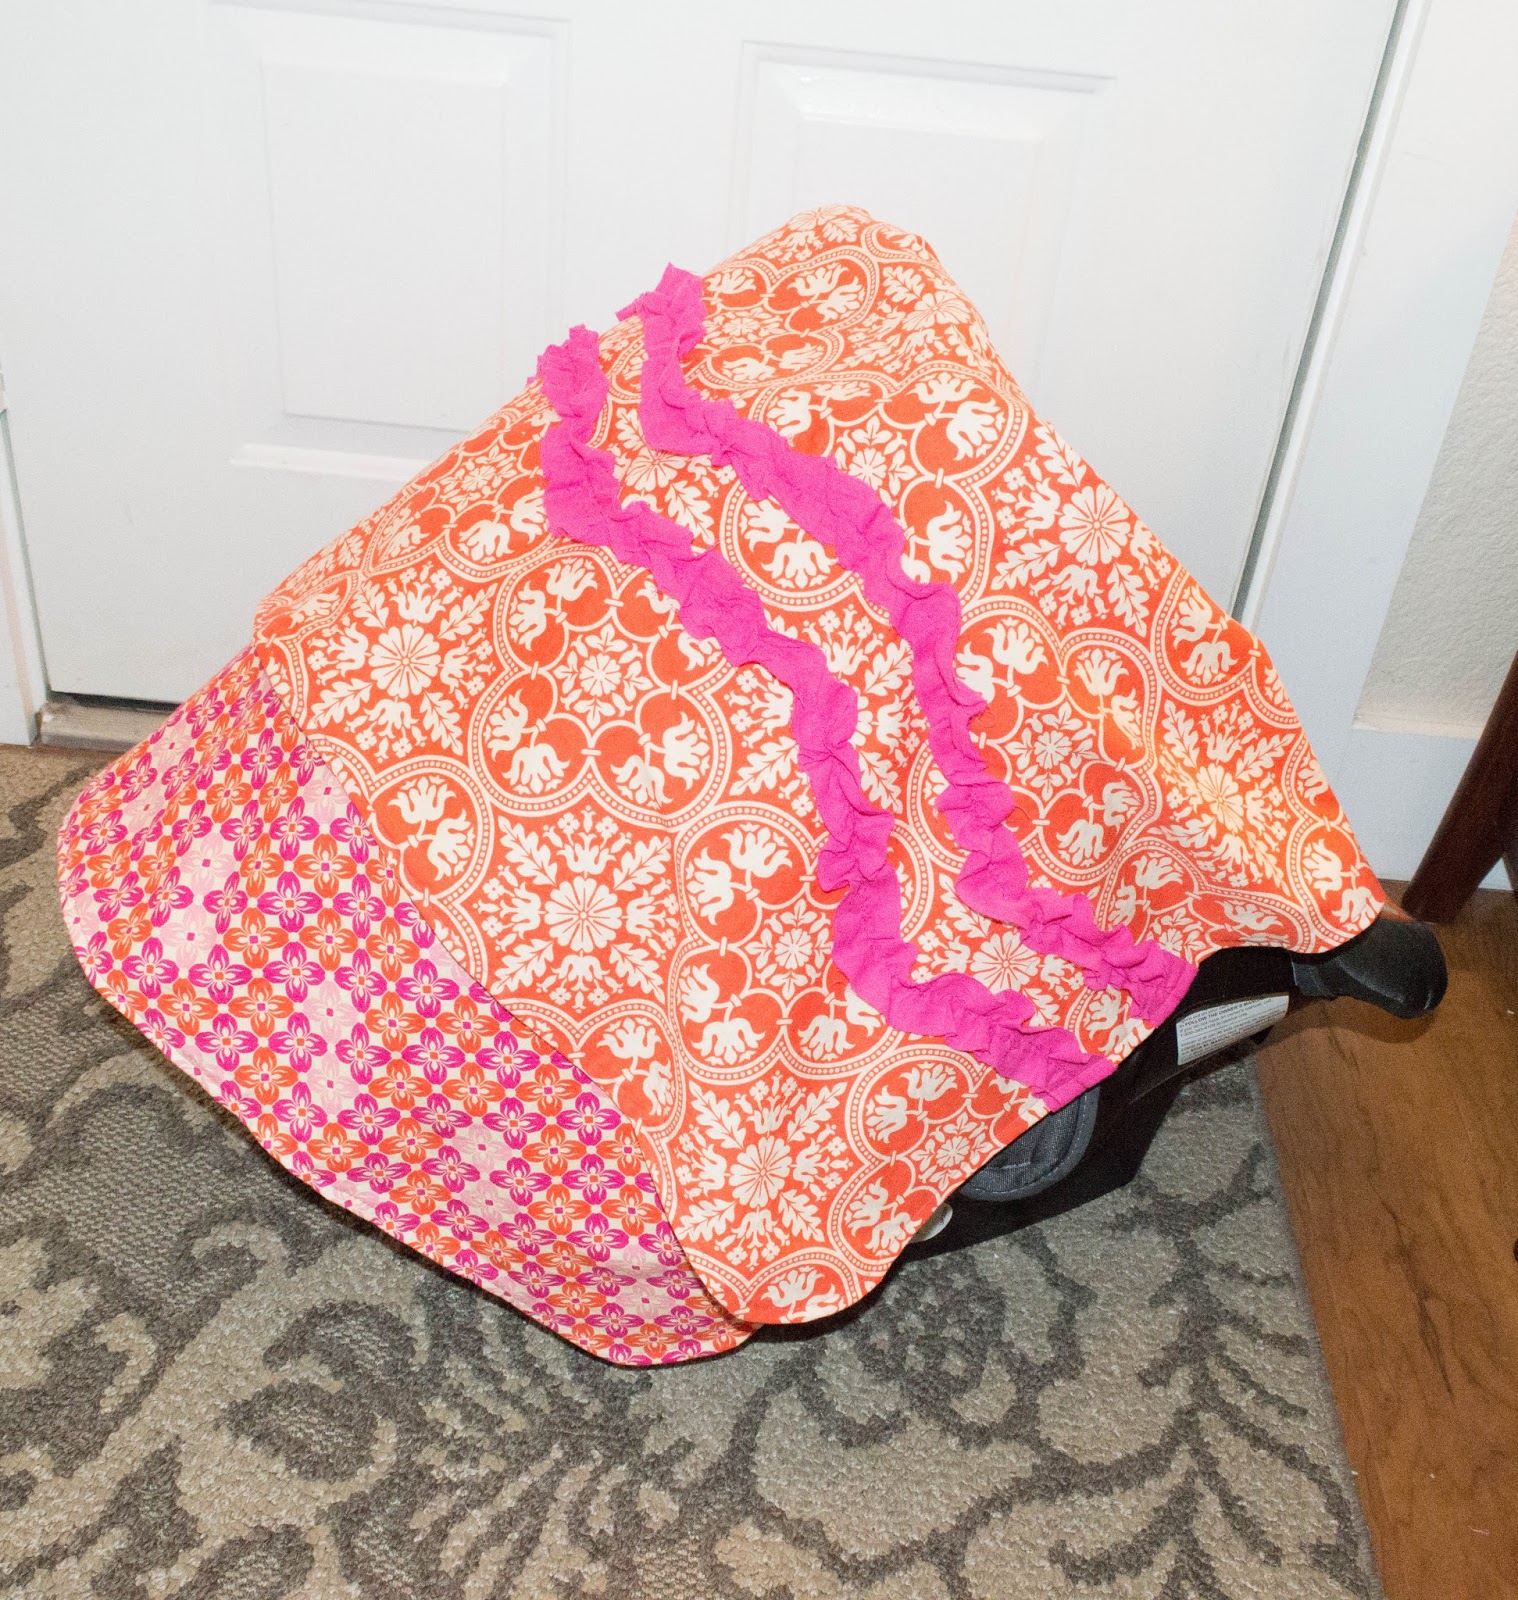
This shows the canopy when the bow shows while shut and then opened.

Since I was going on vacation, I just finally made the coordinating Infant car seat strap covers that I put on Facebook yesterday.
Here is the photo.

I love it.
Makes me hope for a girl since the choices of fabrics and *everything*
are SOO much more fun and abundant than for boys.
Thanks for looking!
Ps. I'd love if you left a comment if you made it this far!
Monday, August 19, 2013
HAPPY MONDAY!!
Mondays. I love them because I don't sew on Sundays.
But in order to not feel too guilty, I have to clean first.
Today, started out early.
6:15!
My baby was up, which got me started on my "job list" quite earlier than I normally would.
After a list, you don't want to read, that is done, all I now need to do
is to finish the 3 loads of laundry that need to be folded. Then I can sew.
This weekend, I listed a few new swaddle designs (limited quantities) in my ETSY shop.
Here is a look.

The new prints!

New chevron prints


new starburst prints
Well, off to those clothes I mentioned. (ugh)
Have a great MONDAY!
Thursday, August 15, 2013
Back from vacation
We went on a trip to the beautiful Pacific Northwest for a month (July). Now I don't know anyone who wouldn't want to live there in the summers-in this house at least. Those cool mornings and evenings..THE GREEN. Now coming from Arizona, you appreciate green and flowers and country roads a LOT more when you are in them..I always come back wondering how I can make my house in the city(desert) a little more country-like. Inside is where that works-so slowly I am trying to convince my hubby to like the vintage and old. Rustic. It's working I think. ;)
 (extra large because the beauty. This is in Downtown Snohomish, WA. Love those shops and this view! I was seriously questioning why I live in AZ. Rivers? Not where I live now. But I love it here most of the year, so it's not a big deal..although looking at this photo again...*dream*)

So, a week after we returned home, school began. This past Monday. My daughter loves First Grade. Especially, her desk. "It isn't like Kindergarten where you are at a table". Oh the joys! Let's hope it lasts.
While in Washington, I visited a few fabric/quilt stores near the southern area of the state. My daughter picked out fabric from Craft Warehouse in Vancouver, WA.
This fabric is by Timeless Treasures Fabrics, LLC
what the label says: timeless treasures fabrics of SoHo, LLC...patt # geo-c9664
This fabric is by Timeless Treasures Fabrics, LLC
what the label says: timeless treasures fabrics of SoHo, LLC...patt # geo-c9664

Photo from here: to purchase as well.
Another place to purchase is Hawthorne Threads.
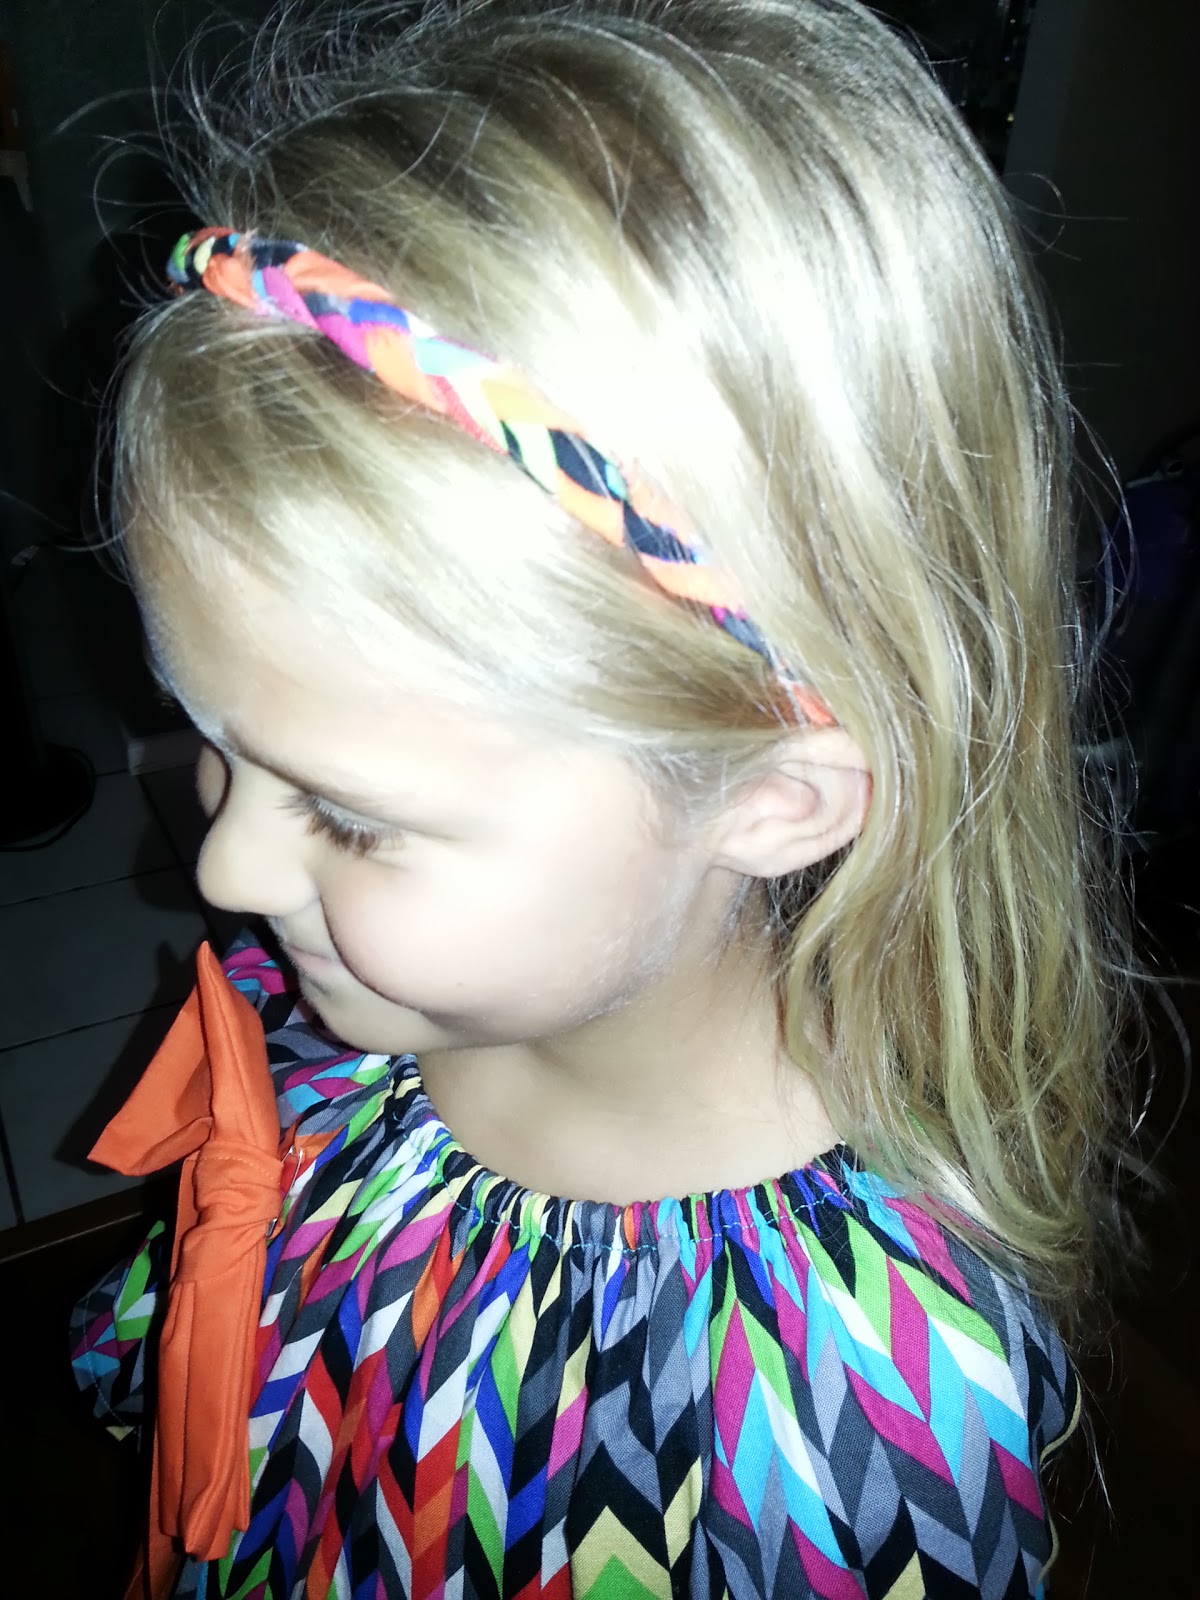

Here is the dress I made from the fabric above that is HARD TO FIND. I am guessing not much of it was printed, since it was hard to google even! (orange solid is from Joann's). I put the bow on a pin to have it removable.
The headband I made while she was at school since I didn't get it done in time. (oops).
All I did was braid 3 strands(2 print, 1 orange solid) and then sew it onto a ponytail for stretch.
She already wanted to wear the dress again now that it is clean because she has a headband to match. I said maybe next week. :)
Thanks to Whimsy Couture Patterns for another great pattern!
(that I purchased, just first time using it).
If interested, the pattern I used was Bodalicious Bow Peasant Dress and is available here.
(it's on sale! 25% off!!)
My quick review: This is my second pattern I've used of Whimsy Couture's and like the first, was VERY easy to follow! Great for beginners. They only thing is that you need to sew with elastic(I haven't besides casings) , although I chose to use shirring for the arms.
Thanks for looking! Have a great day!
Subscribe to:
Posts (Atom)